Pages - Menu

Showing posts with label Holidays. Show all posts

Thursday, November 28, 2013

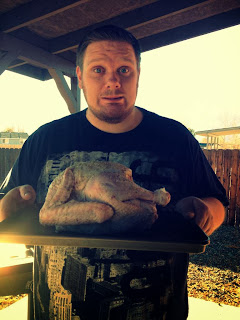
Happy Thanksgiving from the Johnson's! (Countdown to Thanksgiving Finale)

Yes, Donald's eyes are closed..they were in every picture.
We wanted to wish you all a Happy Thanksgiving! We hope you all had a wonderful Thanksgiving, had friends or family to celebrate with, and had many things to be thankful for. We wanted to thank you all for sharing in our blog! It makes us feel a little closer to home and all those that we love.


We had a wonderful Thanksgiving, celebrating with close friends in Nevada! The days of prep work to make a fully homemade Thanksgiving feast were totally worth it! The food was amazingly delicious and it was so great knowing that it was all healthy.

Check out all the veggies on that plate!
We had a lot of fun blogging our Countdown to Thanksgiving and hope you had fun reading it. We are wrapping up our awesome celebration by introducing a few of our young adults to a family Thanksgiving tradition: watching Miracle on 34th Street =)

And on that note...who's excited for Christmas?!? I'm so excited to start decorating in the morning!! Have you decorated yet or are you planning to this weekend? We will be traipsing into the woods to cut down our Christmas tree on Saturday!

Wednesday, November 27, 2013

Countdown to Thanksgiving - Easy Centerpiece Ideas


If you're looking for easy ways to jazz up your Thanksgiving table, I came up with a few easy and possibly free (depending on what you have on hand) ideas.

  1. Leftover pumpkins from Halloween. If you have any small pumpkins left from Halloween or have found them on clearance recently, they make great centerpieces! I had several leftover, plus I was given a few recently, so I used them as my focal point. There are lots of options with pumpkins. You paint them, write on them, or leave them plain. You could even have your guests write what they're thankful for on the pumpkins!
  2. Use cake stands or cupcake towers to display on. I put my pumpkins and some leaves on my glass cupcake stand that comes apart. The variation of size makes it visually interesting. You could use just one or multiples. They are great for displaying candles, pumpkins, leaves, gourds, or whatever else you think up.

  3. Fill jars with acorns, painted or all natural. We went acorn picking a while back at one of our local parks filled with Oak trees and came home with a grocery bag full of acorns. Once we baked them to get all the critters out, we just ended up putting them in jars around the house. They were pretty, but I wanted get a little more creative with some of them. I ran across this blog about painting acorns on Pinterest. This would be a great project to do with kiddos! We just used some acrylic craft paint we had on hand. They turned out beautiful if I do say so myself!
  4.  Scatter some leaves and candles in the center of the table. If you are looking for a very basic centerpiece, this would be the easiest! I just grabbed a couple things of fake leaves at the dollar store and then cut them off the stems. You could then scatter any size combination of candles on top of the leaves. Or, if you want to get really creative, you could cut holes in gourds or apples and pop in tea lights, like they do here.

I ended up doing a combination of most of the above. The important thing is to get your creative on and have fun with it!

We will posting our final Countdown to Thanksgiving post tomorrow!

Tuesday, November 26, 2013

Countdown to Thanksgiving - Clean Eating Cranberry Sauce with Grass-fed Gelatin

As I mentioned in yesterday's blog, I love the Ocean Spray jellied cranberry sauce! It's on my table every Thanksgiving and I can't imagine eating the feast without it. The problem is...it's not exactly healthy. And it certainly does not fall into the clean eating category. Therefore, I set out to concoct my own recipe, hoping to come up with a very similar, but healthy alternative.


I knew I wanted to use grass-fed gelatin because of all its healthful goodness! And I definitely wanted to use real cranberries, not just cranberry juice. I also thought I could sub out some of the sugar for organic, unfiltered apple juice. Here's what I came up with:

What you need:

2 - 12 oz bags Fresh Cranberries
2 1/2 C Organic Apple Juice
2 C Water
Honey to taste
1-2 Tbsp Grass-fed Gelatin
Soup Pot
Strainer
Whisk
Measuring Cups and Spoons
Large Bowl

Start by pouring both bags of cranberries into the soup pot. Add water and apple juice to the pot.

Bring to a low boil and simmer for 30-45 minutes. You want the cranberries to burst and become very soft.

Put strainer over large bowl and pour cranberry mixture into strainer. Press the cranberry pulp until you've gotten all the juice out. It should yield about 3 1/2 cups of juice.


Taste juice to see if it is at your desired sweetness. Mine was extremely tart still at this stage despite the apple juice. I ended up adding 6 tablespoons of raw honey to the warm mixture, tasting in between each tablespoon until it reached the right ratio of tart and sweet.


Whisk gelatin into warm cranberry juice. For a soft set, use 1 tablespoon of gelatin. For a firm set (like use in a mold), use 2 tablespoons. If the whisking creates a lot of foam, skim it off the top and discard.

You can either pour it into a bowl or a mold. If using a mold, grease them before hand. I wanted more of the softer set, but still put the sauce in 4 wide mouth jelly jars. They take up less room in the fridge and that way I can open one at a time.


Once in desired container, cover and refrigerate until set and ready to enjoy on Thanksgiving!

For more Thanksgiving inspiration, check out the rest of our Countdown to Thanksgiving posts!

Monday, November 25, 2013

Countdown to Thanksgiving - 9 Ways to Eat Clean this Thanksgiving


This is our first Thanksgiving as clean eaters and we're pretty excited about it! In years past, I have used things like boxed stuffing, canned cranberry sauce, and pre-made pie crusts. This year, I am cooking EVERYTHING from scratch! It is quite the undertaking, but I've spread it out over several days to make it a smooth process. I wanted to share some of the ways we are incorporating clean eating into our feast!
  1. Add more vegetable dishes to your menu. As I looked at menus on the internet and at our's from previous years, I realized that there weren't very many vegetables involved in the typical Thanksgiving menu. I decided to add in Roasted Carrots and Wilted Spinach with Raw Romano Cheese.
  2. Homemade Stuffing from Homemade Bread. Stuffing is my favorite Thanksgiving item and I am so excited to try this fully homemade version! Depending on your grain preferences, you could use Sourdough, Soaked Wheat, or Ezekiel bread. If you're not up for making your own bread, you could also pick up your preferred healthy bread.
  3. Homemade Cranberry Sauce with Grass-fed Gelatin. I looooove the Ocean Spray Jellied Cranberry Sauce and can't imagine Thanksgiving without it. This year, I am making my own from actual cranberries, organic apple juice, and grass-fed gelatin (which is very healthy for you!). You can find the recipe here on our blog tomorrow!
  4. Swap out regular refined sugar and corn syrup for healthy alternatives. Coconut sugar, maple syrup, honey, brown rice syrup, organic corn syrup, and real cane sugar are all great alternatives! Even though we're clean eaters, we still choose to enjoy the Holidays and goodies. When possible, I clean our traditional recipes up so that we're consuming healthier versions of the classics. They still taste just as good, sometimes better!
  5. Use real butter instead of margarine. Margarine is chocked full of hydrogenated oils and chemicals. Butter is actually really good for your body, especially if you can find grass-fed (like the Kerrygold brand). Here's a great article about the benefits of butter.
  6. Soak nuts to reduce phytates and enzyme inhibitors. If your baking pecan pie, putting nuts in your salad, or using nuts in your stuffing, I would highly recommend soaking them a few days prior and then letting them dry on the counter till your ready to cook. (10 reasons why your should soak nuts).
  7. Make your own pie crust with butter/lard. This is a great clean eating recipe for pie crust. It is very clear that you do not want to use lard/shortening from the grocery store. You only want to use grass-fed lard/tallow. She even walks you through rendering your own lard! If you don't have access to lard, you can use all butter. I recently made this recipe with butter and it turned out amazing! Hands down, best pie crust I've ever had! The key to an extra flaky crust is leaving big globs of butter in the dough.
  8. Use homemade chicken or turkey stock instead of canned broth. I make bone broth all the time and have lots of it saved up for Thanksgiving! If you don't, it's pretty simple. You can either use a whole chicken or just the bones of the chicken. Put it in a large soup pot with some carrots, celery, and onion. Cover with cold water and put in a few splashes of apple cider vinegar. Let sit for 30 minutes. Bring to a low boil and simmer for 4-24 hours. The longer, the better, but if your short on time, the 4 hours will work.
  9. Make your own gravy instead of using the kind from a jar. One of the best reasons is that it tastes better! Even after several years, I still get nervous making gravy, but somehow it always works out. I just follow one of the easy gravy recipes using turkey drippings and chicken stock.
I hope you feel inspired to make some clean eating changes to your Thanksgiving. Even if you aren't able to make all of the changes this year, starting with a few is a great step in the right direction! 

We will be continuing our Thanksgiving Countdown tomorrow with my new recipe for Jellied Cranberry Sauce!

Sunday, November 24, 2013

Countdown to Thanksgiving - Grillin' Up the Turkey!


I feel like I have never really been involved in the cooking of anything at the holiday celebrations that we have throughout the year. Of course, I enjoy BBQ-ing and I cook this way as often as I can (steak, ribs, brisket and other roasted veggies). I enjoy it so much! Sometimes there are just fun things to throw on the BBQ and see what kind of tastes you can come out with! Hence what I am writing about: how to grill up a golden delicious turkey!

I started out where everyone starts, the prep work! I tend to trim up any meat that I grill, especially where there is excess fat or skin. Next: choose your seasonings! Anything that is acceptable to your taste will do. In this case, I picked thyme, rosemary, salt, onion powder, and oregano. Take your time in this phase. Make sure that you get all the areas of the turkey covered with these tasty spices, use as much or as little as you deem necessary.


Most people would decide against grilling or BBQ-ing a turkey because it tends to dry out. Although you may have done your best to keep it moist, it went south. This is our trick, we cut up half of an onion into shards and cut a small apple into pieces. Now stuff the turkey with these high moisture, aromatic items! I used a few tooth picks to hold in the apple and onion pieces to make sure they didn't dump out in the moving or flipping process of grilling.


Now it's time! Make sure your grill is heated up and ready to cook! You'll want to keep your grill in the 350-400 degree range to ensure that the turkey will cook well. Even heat is your friend here.


Cooking time will vary by weight but because this guy was a small one, weighing in at just under 8 pounds. I grilled it for about 3-1/2 hours. Initially, I put down some foil for the first 2 hours, as well as over the top of the turkey to make sure that the heat would not just cook the under side of the bird or char the skin.


I also added in a bit of my own flair, I placed a few cups of water in a oven safe dish, put it on the grill and added mesquite liquid smoke to the water! When your grill starts to boil up the water, the mesquite will add a wonderful flavor to the turkey.


Now you wait. Keep moving of the turkey and opening of the grill to a minimum for the first 2 hours. Allow the smoke flavor to sink into the meat. ( Now I'm Hungry! ) After a few hours had gone by, I took out the foil completely. At this point, you want to start getting those glorious grill marks on the turkey. I rotated the bird every 30 minutes. Once you have achieved a lower turkey breast temperature of 165 degrees, you are done! Here is the end result!


Enjoy this fun Thanksgiving cook out idea and check back tomorrow for Erica's post about how to include clean eating in your Thanksgiving meal as we continue our Countdown to Thanksgiving!

Saturday, November 23, 2013

Countdown to Thanksgiving - Pumpkin Spiced Cider

As our ode to Thanksgiving continues, we knew pumpkin was a must! To our young adults (Donald and I are the pastors of a young adults group called Flashpoint), I am known as pumpkin queen in the Fall. We've sat around joking several times about what kind of crazy pumpkin recipes I'll come up with next. During one of those discussions, Pumpkin Cider came up. I decided that Thanksgiving was the perfect time to take that challenge and come up with a recipe! This one is not based off any Pinterest searches, just plain ol' Erica ingenuity! Here's what I came up with.


What you need:

4 C Apple Juice (I used unfiltered organic from Trader Joe's)
1/4 C Pumpkin Puree (all of my homemade was gone, so I used store bought)
1 tsp Cinnamon
1 tsp Pumpkin Pie Spice
2-5 Cloves (depending on how spicy you want it)
2 Reusable Spice Bags (if you don't have these, you could sub in a coffee filter or cheese cloth and tie with kitchen twine)
Sauce Pot

Measure out your apple juice and pour into pan.


Spoon a 1/4 cups worth of pureed pumpkin into your spice bag and tie firmly.

Add cinnamon, pumpkin pie spice, and cloves into second spice bag and tie firmly.

Place both bags into apple juice and bring pot to a low boil. Simmer with lid for 2-6 hours. The longer you simmer it, the more the flavors will develop.


We let ours simmer for about 6 hours and it had a great depth of flavor! It tasted great served warm or cold. If you want the pumpkin to be the main star, lessen your spice mixture so that it's not so prominent.


We will definitely be serving this on Thanksgiving day, both for a festive beverage AND because it makes the house smell just heavenly!!

Check back for another Countdown to Thanksgiving post tomorrow!

Friday, November 22, 2013

Countdown to Thanksgiving - Give Thanks Banner Craft

Donald and I are pretty excited about our first Thanksgiving as clean eaters and as bloggers! We decided that we wanted to do a count down to Thanksgiving. That means every day for the next week we will be posting a Thanksgiving themed blog post! It will vary between crafts, recipes, and ways to incorporate clean eating into your traditional Thanksgiving fare.


We're kicking off with a simple craft to liven up your dining room! I'm sure some of you already have beautifully decorated dining rooms, but I'm certainly not one of them. My poor walls are bare and in desperate need of some love. When we moved to Nevada last year, we downsized majorly and got rid of almost all of our stuff to cut down on moving costs. That meant we had a whole house to furnish when we moved into our own place in August. We picked things like couches instead of art for the walls (necessities, you know ;) So as I planned my Thanksgiving menu and started thinking about how I wanted to decorate my table, I realized that my walls needed some kind of spice!

I searched through Pinterest, but didn't see anything that particularly struck my fancy. So I came up with something of my own. I had made this kind of flag banner for a baby shower and knew how cute they looked. This time I wanted to add letters and do it in a Fall colored them however. I did a quick trip to Michael's and was very happy that everything I wanted was on sale.

(By the way, I'm sure you will noticed the lovely green carpet in several of these pictures. Yeah. That's the color of my carpet. >_<)


What you need:

Scrapbook Paper
Stick-on Letters or Letter Stencil
Tape or Glue Dots
String
Scissors
Ruler
Pen/Pencil


I started by drawing a triangle with the ruler to figure out what size I wanted. I decided on 6 inches for each of the long sides.

Draw and cut out the model triangle from a piece of scratch paper.

Then flip over the scrapbook paper to the back side and trace the triangle on to it. I was able to get about 6 triangles out of each 12x12 piece of scrapbook paper.

After the triangles were cut out, I attached the stick on letters. I decided to have my banner say, "Give Thanks."

Lay out the triangles in the order you wanted them, then keeping in that order, flip upside down. I did two banners; one that said "Give" and the other saying "Thanks!"

Once the triangles are laid out upside down, run your string along the top of each and tape in place. I had glue dots left over from a project, so I used a combination of glue dots and tape.


And with that, your done. All that's left is to hang it up on your wall. I just tied it to some thumb tacks to hang it.


My dining room is not the most well-lit place, so it made it hard to get a good picture. But I guarantee, it looks awesome in person! I put a little leaf wreath below it to add a little more interest to the huge wall it's hanging on.

I hope this provides you with some crafty Thanksgiving inspiration! Please check back tomorrow for a very unique Thanksgiving recipe as we continue our Countdown to Thanksgiving!

Friday, November 8, 2013

Homemade Eggnog


It's that time of year again! We loooove eggnog in this house! Since the last holiday season however, we've become clean eaters. We grabbed a carton of the store bought stuff a few weeks ago and it just didn't seem the same, plus we knew that it was chocked full of refined sugar and chemicals.

It turns out that eggnog can actually be a healthy drink, full of vitamins and nutrients, if its made at home with whole foods! It's a beverage that is even recommended by Weston A Price.

Definitely the healthiest version is made with raw milk and raw cream, but not everyone has access to it (e.g. it's illegal to sell in Nevada). Pasture-raised eggs are an absolute must though, no matter what version you make, because you will be consuming the yolks raw. Check with your local farmer for fresh, pasture raised eggs (EatWild.com is a great resource for finding local farmers.) They can also be found at places like Whole Foods and Marlene's, but probably won't be quite as fresh as from the farm.

Comparing a normal cage free brown egg yolk to the pasture raised egg yolks. See the color difference? Pastured yolks are orange and firm, while normal cage free are yellow and break easily.

This article, in the "How to cook your eggs or not" section, explains why it's safe to eat pastured eggs raw. This blog post also explains the benefits of eating raw pastured eggs and why its safe.

So on to the recipe!


What you need:

1 1/4 cups whole milk (non-homogenized and not ultra-pasteurized preferred)
1 3/4 cups half & half (not ultra-pasteurized preferred)
1 cup heavy whipping cream (not ultra-pasteurized preferred)
4 pastured egg yolks (The only place I could find them this time of year was at Whole Foods)
3 Tbsp organic maple syrup
1/2 tsp vanilla
1 1/2 tsp nutmeg
1 1/2 tsp cinnamon


Start by separating your egg yolks from egg whites. (Make sure to keep your whites for a great macaroon recipe coming soon on the blog!)

Measure everything into a small mixing bowl or blender. Blend for about a minute, until the yolk are well incorporated and everything is frothy.


I then poured mine into a quart sized mason jar. You can pour yourself a glass right away or you can stick it in the fridge and let the flavors develop some more. The spices usually rise to the top, so make sure to give it a good shake or stir before pouring a glass.

The recipe is definitely adjustable! The ratio of milk to creams can be played with to suit your taste, as well as the spices and sweetness. This recipe makes just a about a quart and can be easily cut in half or doubled to make more.


Sunday, October 20, 2013

Homemade Pumpkin Puree

I don't know about anyone else, but Fall is one of my most favorite times of the year! One of the reasons its my favorite is PUMPKIN! I love all things pumpkin! Pumpkin bread, pumpkin chai tea lattes, pumpkin chili, pumpkin chocolate chip cookies, pumpkin bars, pumpkin cider (that's right, I have recipes for alllll these things and I plan on sharing!).
So when I started getting the pumpkin itch, I checked out the prices on canned pumpkin. I was not thrilled, to say the least. I bought a few cans, but at $1.88 a can (the small ones), I knew it was going to be a budget buster if I bought enough for all my recipes. 

The next time I went to the store, they had put those huge bins of pumpkins out in the front of the store. I saw $0.25/lb and I was struck with a brilliant idea! Why don't I make my own pumpkin puree? Now I know what you're thinking. Those are carving pumpkins. Wouldn't they taste funny? Well, I'm here to tell you that they don't!
I picked out two small ones, about 6 lbs each and paid $3.
When I got home, I preheated the oven to 375 F. I cut off the top of the pumpkin to remove the stem and then cut them each in half. I scooped out the guts and saved them to make roasted pumpkin seeds later. I cut each piece in half, so that the pumpkins were in quarters. I laid them on a cookie sheet, no need to be fancy about. I just smooshed them all on there. 
After baking for 45-60 minutes, they got nice and soft in the oven. When a fork easily poked through the skin, they were done. After they cooled slightly, I took one section at a time and laid it on a cutting board, skin side up. The pieces will still have a bend to them, which makes it difficult to cut the skin off. I just flatten each section with my hand and then used a sharp knife to cut the skin off.
       
After removing the skin of 2 or 3 pieces, I tossed them into the food processor. I blended until the mixture looked smooth. I poured it into a big bowl and repeated the whole process until all the sections had been processed.
Since most recipes call for a can of pumpkin, I checked how many cups were in the small can I had left: 1 3/4 cups. So I measured that into small freezer baggies and ended up with 6 baggies worth! That's $0.50/bag and saves $1.38 compared to the price of the small off-brand can! I simply stored them in the freezer and they have kept and defrosted beautifully!
Before I went shouting about my savings from the rooftops, I wanted to make sure it stood the taste test. I wasn't totally sure it would, since the color of my homemade version was considerably lighter than the canned version. Donald decided to try it in a Pumpkin Chocolate Chip Cookie recipe. We loved them! He took some to work the next day and his co-workers begged him to bring more! 

I also noticed that my local Kroger store (Smith's) just lowered their pumpkin prices to $0.18/lb! This actually included their Sugar Pie Pumpkins!! So I grabbed 10 and plan to stock up the freezer with more pumpkin puree for the holidays! I have heard rumors that pumpkin prices drop dramatically after Halloween, so it may be worth stocking up then too!
 Happy pumpkin cooking!